Blog

Digging into Data Science Tools: Anaconda

In the Digging into Data Science Series, I dive into specific tools and technologies used in data science and provide a list of resources you can find to learn more yourself. I keep posts in this series updated on a regular basis as I learn more about the technology or find new resources. Post Last updated on May 28, 2018

If you’re familiar at all with Data Science, you have probably heard of Anaconda. Anaconda is a distribution of Python (and R) targeted towards people doing data science. It’s totally free, open-source, and runs on Windows, Linux, and Mac.

Up until recently, I basically treated my installation of Anaconda as a vanilla python install and was totally ignorant about the unique features and benefits it provides (big mistake). I decided to finally do some research into what Anaconda does and how to get the most out of it.

What is Anaconda and why should you use it?

Anaconda is much more than simply a distribution of Python. It provides two main features to make your life way easier as a data scientist: 1) pre-installed packages and 2) a package and environment manager called Conda.

Pre-installed packages

One of the main selling points of Anaconda is that is comes with over 250 popular data science packages pre-installed. This includes popular packages such as NumPy, SciPy, Pandas, Bokeh, Matplotlib, among many others. So, instead of installing python and running pip install a bunch of times for each of the packages you need, you can just install Anaconda and be fairly confident that  most what you’ll need for your project will be there.

Anaconda has also created an “R Essentials” bundle of packages for the R language as well, which is another reason to use Anaconda if you are an R programmer or expect to have to do some development in R.

In addition to the packages, it comes with other useful data science tools preinstalled:

  • iPython / Jupyter notebooks: I’ll be doing a separate “Digging into Data Science Tools” post on this later, but Jupyter notebooks are an incredibly useful tool for exploring data in Python and sharing explorations with others (including non-Python programmers). You work in the notebook right in your web browser and can add python code, markdown, and inline images. When you’re ready to share, you can save your results to PDF or HTML.
  • Spyder: Spyder is a powerful IDE for python. Although I personally don’t use it, I’ve heard it’s quite good, particularly for programmers who are used to working with tools like RStudio.

In addition to preventing you from having to do pip install a million times, having all this stuff pre-installed is also super useful you’re teaching a class or workshop where everyone needs to have the same environment. You can just have them all install Anaconda, and you’ll know exactly what tools they have available (no need to worry about what OS they’re running, no need to troubleshoot issues for each person’s particular system).

Package and environment management with Conda

Anaconda comes with an amazing open source package manager and environment manager called Conda.

Conda as a package manager

A package manager is a tool that helps you find packages, install packages, and manage dependencies across packages (i.e. packages often require certain other packages to be installed, and a package manager handles all this messiness for you).

Probably the most popular package manager for python is it’s built-in tool called pip. So, why would you want to use Conda over pip?

  • Conda is really good at making sure you have the proper dependencies installed for data science packages. Researching for this blog post, I came across many stories of people having a horrible time installing important and widely used packages with pip (especially on Windows). The fundamental issue seems to be that many scientific packages in Python have external dependencies on libraries in other languages like C and pip does not always handle this well. Since Conda is a general-purpose package management system (i.e. not just a python package management system), it can easily install python packages that have external dependencies written in other languages (e.g. NumPy, SciPy, Matplotlib).
  • There are many open source packages available to install through Conda which are not available through pip.
  • You can use Conda to install and manage different versions of python (python itself is treated as just another package).
  • You can still use pip while using Conda if you cannot find a package through Conda.

Together, Conda’s package management and along with the pre-installed packages makes Anaconda particularly attractive to newcomers to python, since it significantly lowers the amount of pain and struggle required to get stuff running (especially on Windows).

Conda as an environment manager

An “environment” is basically just a collection of packages along with the version of python you’re using. An environment manager is a tool that sets up particular environments you need for particular applications. Managing your environment avoids many headaches.

For example, suppose you have an application that’s working perfectly. Then, you update your packages and it no longer works because of some “breaking change” to one of the packages. With an environment manager, you set up your environment with particular versions of the packages and ensure that the packages are compatible with the application.

Environments also have huge benefits when sending your application to someone else to run (they are able to run the program with the same environment on their system) and deploying applications to production (the environment on your local development machine has to be the same as the production server running the application).

If you’re in the python world, you’re probably familiar with the built-in environment manager virtualenv. So why use Conda for environment management over virtualenv?

  • Conda environments can manage different versions of python. In contrast, virtualenv must be associated with the specific version of python you’re running.
  • Conda still gives you access to pip and pip packages are still tracked in Conda environments
  • As mentioned earlier, Conda is better than pip at handling external dependencies of scientific computing packages.

For a great introduction on managing python environments and packages using Conda, see this awesome blog post by Gergely Szerovay. It explains why you need environments and basics of how to manage them in Conda. Environments can be a somewhat confusing topic, and like a lot of things in programming, there are some up-front costs in learning how to use them, but they will ultimately save tons of time and prevent many headaches.

Bonus: no admin privileges required

In Anaconda, installations and updates of packages are independent of system library or administrative privileges. For people working on their personal laptop, this may not seem like a big deal, but if you are working on a company machine where you don’t have access to admin privileges, this is crucial. Imagine having to run to IT whenever you wanted to install a new python package – It would be totally miserable and it’s not a problem to be underestimated.

Further resources / sources

Big Transportation Data for Big Cities Conference: My Takeaways

For a long time, I’ve been interested in transportation and urban economics. When I was doing my Masters, I planned to specialize in these areas if I continued on to a PhD. So, when I saw a job position open for Data Scientist at the City of Winnipeg Transportation Assets Division, I didn’t have to spend much more than two seconds considering whether I would apply. 

Well, a few months have passed and I’m happy to announce that I was successful: I’m starting the position this week. To say I’m excited is a huge understatement. The Division has been doing very great things with the recent development of the Transportation Management Centre (TMC) and I’m looking forward to being a part of these cutting edge efforts to improve the City’s transportation system.

To get up to speed, I’ve been looking through various sources to get an idea what municipalities have been up to in this space. I was pointed to the Big Transportation Data for Big Cities Conference, which took place in 2016 in Toronto and involved transportation leaders from 18 big cities across North America. The presentations are all available online and are a great source to understand the kind of transportation data cities are collecting, how they’re using it, possibilities for future use, and challenges that remain.

How cities are using transportation data

Municipalities are collecting unprecedented amounts of data and working to apply  it in a variety of ways. Steve Buckley from the City of Toronto Transportation Services provides a useful categorization of the main areas of use for city transportation data: describing, evaluating, operating, predicting, and planning.

Describing (Understanding)

A fundamental application of the transportation data flowing into municipalities is simply to provide situational awareness about what is actually happening on the ground. This understanding is a prerequisite to all other forms of data use.

In the past, this was hard and expensive, but with widespread GPS, mobile applications, wireless communication technology, and inexpensive sensors, this kind of descriptive data is becoming cheaper to collect, easier to collect, and more detailed. 

There appears to still be a lot of “low hanging fruit” for improving safety and congestion by simply having more detailed data and observing what is actually happening on the ground. For example, one particularly interesting presentation from Nat Gale from the Los Angeles Department of Transportation points out that only 6% of their streets account for 65% of deaths and serious injuries for people walking and biking (obviously prime targets for safety improvements). His presentation goes on to describe how they installed a simple and inexpensive “scramble” pedestrian crossing at one of the most dangerous intersections in the city (Hollywood / Highland) and this appears to have increased the safety of the intersection dramatically.

Evaluating (Measuring)

While descriptive data is crucial, it is not sufficient. You also need to understand what is most important in the data (i.e. key performance indicators) and have reliable ways of figuring out whether an intervention (e.g. light timing change) actually produced better results.

Along these lines, one particularly interesting presentation was from Dan Howard (San Francisco Municipal Transportation Agency) on their use of transit arrival and departure data to determine transit travel times (no GPS data required). Using this data, they can compare travel times before and after interventions, and understand the source of delays by simply examining the statistical distribution of travel times (e.g. lognormal distribution means good schedule adherence, normal distribution implies random events affect travel times, and multiple peaks indicate intersection / signal issues).

Operating

A key theme throughout many of the presentations is the potential benefits of being able to get traffic data in real time. For example, several municipalities have live real-time camera observations, weather data, and mobile application data (among other sources). These sources can provide real-time insight into operational improvements, such as real time congestion and light timing adjustment, traffic officer deployment planning, construction management, and detecting equipment / mechanical failures.

Predicting

The improved detail of data, the real-time nature of the data, and evaluation techniques come together to enable a variety of valuable predictive analytics allowing municipalities to take proactive response (e.g. determining the locations at highest risk of congestion or accidents and preventing accidents before they happen).

Planning (Prioritizing investments)

With improved data and improved insights from the data, municipalities can do better planning of investments to yield the highest value in terms of some target (e.g. commute times, accidents).

Municipalities are starting to capitalize on the benefits of open data

One common thread throughout many of the presentations is the benefits of opening up city data to the public, third parties, and other government departments. Although this is not without its challenges, there are many potential benefits.

Personally, as a data-oriented person, I’m particularly gung-ho about opening data up to the public, as long as the data does not infringe on anyone’s privacy and the cost of making the data public is not too high. I feel like this should be almost a moral imperative of public institutions – if you’re collecting public data, then the public should be able to access that data (again, after considering privacy concerns and resource constraints).

But there are much more selfish reasons other than moral principle for cities to open up the data, and based on these presentations, municipalities starting to understand these benefits.

One important advantage is by making the data public, you create opportunities for others to do analysis or write software applications that your organization simply does not have the resources to do. For example, it may not be a core competency of a transportation department to build, deploy, and maintain mobile applications. However, many people want something like this to exist, and making transit schedules accessible through a public API facilitates others to do this work. In these cases, the municipality plays the role of enabler.

Another thing to consider is that people can be quite ingenious and figure out things to do with the data that you never dreamed of. By making the data public, you can crowdsource the ingenuity and resourcefulness of citizens for the benefit of the public. Municipalities can do this not only by opening the data, but also by hosting public events such as urban data challenges or open data hackathons. Sara Diamond from OCAD University went through several examples of clever visualizations and related projects resulting from open transit data. 

Another advantage of opening data is that it promotes collaboration with other municipalities and other departments within a single municipality. Opening the data builds competencies that can come in handy even if the data is not made public: for example, it may help a municipality share critical transportation data with other departments (e.g. emergency response teams).

This collaborative approach seems central for many municipalities in the conference. For example, Abraham Emmanuel from the City of Chicago talks about the City’s Transportation Management Center, which is working to “develop an integrated and modular system that can be accessed from anywhere on the City network” and “create interfaces with external systems to collect and share data” (where “external systems” can include the Chicago Transit Authority, Utilities, Third Parties, and others).

Municipalities are opening up to open source

Increasingly, municipalities are beginning to understand the value of open source software and incorporating it into their operations. Bibiana McHugh from TriMet Portland provides a useful comparison of the advantages of proprietary software versus open source software, with open source providing more control, fostering innovation / competition, resulting in a broader user and developer base, and the low entry costs.

Catherine Lawson from the The University at Albany Visualization and Informatics Lab (AVAIL) similarly presents benefits of open source, noting advantages such as defensible outputs (open platforms allow for 3rd party verification of output) and trustworthiness (open platforms can lead to a robust shared confidence in outcomes). In contrast, the advantages of proprietary models include alignment with procurement processes and the fact that it is the traditional, (currently) best-understood model.

Perhaps the best illustration of open source in action is given in Holly Krambeck’s (World Bank) presentation showing how open-source solutions can “leapfrog” traditional intelligent transportation systems in resource-constrained cities. She talks about the OpenTraffic program where “data providers” (e.g. taxi hailing companies) collect GPS location data from mobile devices host an open-source application called “Traffic Engine” that translates the raw GPS data into anonymized traffic statistics. These are sent to an server, pooled with other data providers statistics, and served with an API for users to access the data. OpenTraffic is built using fully open-source software and you can find a detailed report of how the project works here.

I think this is very exciting not just for the municipalities that reap the benefits of open source, but for programmers who now have the opportunity to build a reputation for themselves and their city, all while contributing a public good that benefits everyone.

Challenges

Of course, there are challenges that come along with the opportunities of producing large scale, highly detailed transportation data. Mark Fox from the University of Toronto Transportation Research Institute has an extremely useful presentation outlining some of the main challenges often associated with open city data. These include:

  • Granularity (datasets often have different level of aggregation),
  • Completeness: important to think carefully about what to open to the public and having a reason behind opening it
  • Interoperability: datasets across different departments may describe similar things but may not be comparable due to slightly differing schemas / data types)
  • Complexity: the data presented may be very complex and thus the public presentation of that data is limited
  • Reliability: whenever you collect data, there are questions of the reliability of the data that limit the ability to use it and apply it.
  • Empowerment: This is an interesting challenge I had not considered, which refers to the the incentives often built into government organizations to avoid failure at all costs and not engage in any risk-taking through experimentation. There also may tend to be a focus on short-term delivery of political goals and a lack of a long-term strategy of innovation.

Ann Cavoukian from Ryerson University (and formerly the Information and Privacy Commissioner for Ontario) adds privacy to this list of challenges. Her presentation focuses entirely on these issues, along with “Privacy by Design” standards to help mitigate these risks. She points out that extensive data collection and analytics can lead to “expanded surveillance, increasing the risk of unauthorized use and disclosure, on a scale previously unimaginable”. With recent privacy and data breach scandals from Equifax and Facebook since this presentation took place, I assume these issues are even more at the forefront of municipalities’ concerns with respect to transportation data.

Why Data Scientists Should Join Toastmasters

Public speaking used to be a big sore spot for me. I was able to do it, but I truly hated it and it caused me a great deal of grief. When I knew I had to speak it would basically ruin the chunk of time from when I knew I would have to speak to when I did it. And don’t get me started on impromptu speaking – whenever something like that would pop up, I would feel pure terror.

Things got a bit better once I entered the working world and had to speak somewhat regularly, giving presentations to clients and staff and participating in meetings. But still, I hated it. I thought I was no good and had a lot of anxiety associated with it.

A little over a year ago, I finally had enough and decided I needed to do something about it. I joined the Venio Dictum toastmasters group in Winnipeg. After only a few months, I started to become much more relaxed and at ease when speaking. Today, one year later, I actually look forward to giving speeches and facing the challenge of impromptu speaking. A year ago, if you told me I would feel this way now, I wouldn’t have believed you.

Imagine being the type of person that volunteers to address a crowd or give a toast off the cuff. Imagine looking forward to speaking at a wedding, meeting, or other event. Imagine being totally comfortable in one of those “networking event” situations where you enter a room crowded full of people you don’t know. A year ago, I used to think people that enjoyed this stuff were from another planet. Now, I understand this attitude and I feel like I’m getting there myself.

Why should a Data Scientist care about speaking skills?

  • Communication is a critical part of the job

Yes, a huge part of being a data scientist is having skills in mathematics, statistics, machine learning, programming, and having domain expertise.

However, technical skills are not anywhere close to the entire picture. You might be fantastic at data analysis, but if you aren’t able to communicate your results to others, your work is basically useless. You’ll wind up producing great analysis that ultimately never get implemented or even considered at all because you failed to properly explain its value to anyone.

Speaking is a huge part of communication, so you need to be good at it (the other big area of communication is writing, but that’s a topic for another day).

  • Professional advancement

To get to the next level in your career (and to get a data scientist job in the first place), it really helps to be a confident and persuasive speaker.

Job interviews are a great example. When you apply for a job, there will always be an interview component where you’ll have to speak and answer questions you have not prepared for in advance. Even if your resume and portfolio look great, it’s going to be hard for an employer to hire you if you bomb the interview.

This also applies to promotions from within your current company. Advanced positions typically require rely more on communication and management skills like speaking and less on specific technical skills.

  • Network / connection building

Improved speaking doesn’t just make your presentations better: it makes your day-to-day communications with colleagues and acquaintances better too. You’ll become a better conversationalist and a better listener.

As a data scientist, you’ll likely be working with multiple teams within your organization and outside your organization. You will need to gain their trust and support, and better speaking helps you do that.

  • It makes you a better thinker / learner

The motto of my toastmasters club is “better listening, thinking, and speaking” because a huge part of speaking is learning how to organize your thoughts in a clear package so they are ready for delivery to your audience. As George Horace Latimer said in his book Letters from a Self Made Man to his Merchant Son:

“There’s a vast difference between having a carload of miscellaneous facts sloshing around loose in your head and getting all mixed up in transit, and carrying the same assortment properly boxed and crated for convenient handling and immediate delivery.”

Having a lot of disparate facts in your head is not very useful if they are not organized in a way that lets you easily access them when the time is right. Preparing a speech forces you to organize your thoughts, create a coherent narrative, and understand the principles underlying the ideas that you’re trying to communicate.

This habit of understanding the underlying rules and principles behind what you learn is referred to by psychologists as “structure building” or “rule learning”. As described in the book Make it Stick, people who do this as a habit are more successful learners than people that take everything they learn at face value, never extracting principles that can be applied to new situations. Public speaking cultivates this skill.

This is particularly important for data scientists, given the incredibly diverse range of subjects we are required to develop expertise in and the constantly evolving nature of our field. To manage this firehose of information, we must have efficient learning habits.

One great thing about Toastmasters is you can give a speech on any topic you want. So go ahead, give a speech on deep reinforcement learning to help solidify your understanding of the topic (but explain in a way that your grandmother could understand).

  • Speaking is a fundamental skill that will impact your life in many other ways

Speaking is a great example of a highly transferable skill that pays off no matter what you decide to do. Since it deeply pervades everything we do in our personal and professional lives, the ROI for improving is tremendous. (In my opinion, some other skills that fall into this category include writing, sales, and negotiation.)

Consider all the non-professional situations in your life where you speak to others (e.g. your spouse, kids, parents, family, acquaintances, community groups). Toastmasters will make all of these interactions more fruitful.

Suppose you decide data science isn’t right for you. Well, you can be close to 100% sure the speaking skills you develop through Toastmasters will still be valuable whatever you decide to do instead.

In terms of the 80-20 rule, working on your public speaking is definitely part of the 20% that yields 80% of the results. It’s worth your time.

How Does Toastmasters Work?

Although each club may do things a little differently, all use the same fundamental building blocks to make you a better speaker:

  • Roles: At each meeting, there are a list of possible “roles” that you can play. Each of these roles trains you in a different public speaking skill. For example, the “grammarian” observes everyones language and eloquence, “gruntmaster” monitors all the “ums”, “uhs”, “likes”, “you knows” etc. There is a “Table Topics Master” role where you propose random questions to members they have not prepared for in advance and they have to do an impromptu speech about it for two minutes (an incredibly valuable training exercise, especially if you fear impromptu speaking). Here are the complete list of roles and descriptions of the roles in my club.
  • Prepared speeches: Of course, there are also tons of opportunities to provide prepared speeches. Toastmasters provides you with manuals listing various speeches to prepare that give you practice in different aspects of public speaking. You do these speeches at your own pace.
  • Evaluations: Possibly the most valuable feature of Toastmasters is that everyone’s performance is evaluated by others. In a Toastmasters group, you’ll often have a subset of members that are very skilled and experienced speakers (my club has several members that have been with the club 25+ years), and the feedback you get can be invaluable. It’s crucial for improvement, and it’s something you don’t usually get when speaking in your day-to-day life.

Go out and find a local Toastmasters group and at check it out as a guest to see how it works up close. They will be more than happy to have you. You owe it to yourself to at least give it a try. If your experience is anything like mine, you’ll be kicking yourself for not starting earlier (and by “earlier” I mean high school or even sooner – it’s definitely something I’m going to encourage my daughter to do).

Let’s Scrape a Blog! (Part 1)

One thing I’ve been considering lately is what kind of intelligence you could gain from scraping a blog and analyzing the data. To test this out, this is the first in a series of posts where I’ll scrape a blog and try to squeeze out every last bit of useful or interesting intelligence I possibly can.

I’ll start off simple, but down the road I plan to use more advanced techniques in machine learning and natural language processing techniques to see what additional information these tools can uncover. I’m keeping all my analysis on a Jupyter notebook you can find on Github here.

The target site I’ll be using for my analysis is my all-time favourite blog: Marginal Revolution. I have been following this blog pretty much daily since 2005 when I started my undergraduate degree. It’s run by the economists Tyler Cowen and Alex Tabarrok, who are personal heroes of mine.

Why scrape a blog?

For me, scraping Marginal Revolution was just something I did for kicks. Since I’m so interested in the content of the blog, I want to be able to do very customized searches of blog posts that would not be possible through the blog’s built-in search feature.

But there are reasons other than “just for fun” that you might want to scrape a blog. For example, maybe the blog is a competitor or in an industry you’re researching. Maybe you want to find out:

  • Roughly how many people read / comment on the blog
  • Blogging strategy in terms of number, type, and timing of posts
  • Which types of posts produce the most discussion / comments / controversy
  • What notable people read the blog (i.e. seeing if they comment in the comments section)
  • Analyzing trends over time to determine if things have changed

…and I’m sure there are more possibilities.

Very brief overview of how the scraper works

My goal with the scraper was to get each individual post from the Marginal Revolution website. Marginal Revolution was fairly easy to scrape since the list of posts by month provided a predictable URL structure that made it possible to gather the links for each individual post across the entire website. With the full list of links, it was then simply a matter of making a request to each of these URLs and saving the resulting blog post HTML to disk. The scraper ultimately gathered 23,342 posts.

The final step was to extract the information of relevance through each HTML file and conduct data cleaning. I did this with the python BeautifulSoup library to parse the html and then pandas to do some further data cleaning and feature generation. The final result was a nice csv file:

My scraper had a generous delay between requests so I didn’t create a burden on the website. As you would expect, the scraper took a very long time to run to get all the posts – I ran it slowly over a period of about 3 weeks.

Initial Analysis

Often times when reading Marginal Revolution, I would want to search in ways that the built-in search feature wouldn’t allow. For example, I know that Marginal Revolution has had a few guest posts over the years, but they are difficult to find with the search feature because of the sheer volume of posts. Also, many people guest posting are often mentioned in the regular daily posts by Tyler and Alex, further complicating the search.

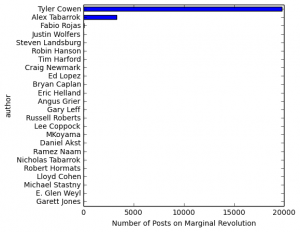
With all the posts scraped, figuring out who has all posted on the site and how many posts they’ve done was easy:

Obviously it’s totally dominated by Tyler Cowen and Alex Tabarrok, as any reader of the blog would expect, but the plot reveals some interesting authors that I had no idea posted on Marginal Revolution.

Now, say I want to look at all the posts by Tim Harford. It’s just a simple filter operation to get all the links and check them out (15 of them):

http://marginalrevolution.com/marginalrevolution/2005/07/dear_economist_-2.html
http://marginalrevolution.com/marginalrevolution/2005/07/using_cartoons_.html
http://marginalrevolution.com/marginalrevolution/2005/07/marginal_revolu-2.html
http://marginalrevolution.com/marginalrevolution/2005/07/we_shall_see_ho.html
http://marginalrevolution.com/marginalrevolution/2005/07/markets_in_ever_6-2.html
http://marginalrevolution.com/marginalrevolution/2005/12/seasonal_advice.html
http://marginalrevolution.com/marginalrevolution/2005/12/seasonal_advice_2.html
http://marginalrevolution.com/marginalrevolution/2005/07/john_kay_on_cli.html
http://marginalrevolution.com/marginalrevolution/2005/12/seasonal_advice_1.html
http://marginalrevolution.com/marginalrevolution/2005/07/choosing_whethe.html
http://marginalrevolution.com/marginalrevolution/2005/07/what_is_the_rig-2.html
http://marginalrevolution.com/marginalrevolution/2005/07/a_critic_on_cri.html
http://marginalrevolution.com/marginalrevolution/2005/07/red_tape_and_ho.html
http://marginalrevolution.com/marginalrevolution/2005/07/should_londoner.html
http://marginalrevolution.com/marginalrevolution/2005/07/risky_business_1.html

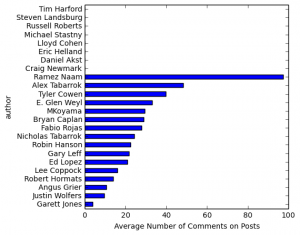
I also looked at the amount of discussion generated by each author:

Note that some of these authors only posted once or twice which would skew their results. Also, some posted in the blog’s early years where there appear to be few comments (e.g. Tim Harford in 2005). Interesting to see that Alex’s posts on average seem to generate slightly more comments. Of course, the total amount of discussion / engagement is way higher for Tyler, given that he posts about 5 times as much as Alex.

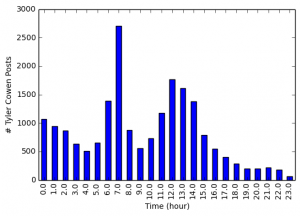
Another easy thing to do is examine the time of post to get an idea of the blogging habits of each of the authors. Each blog post includes the time of publication down to the minute. 

Looking at the time of the post reveals some clear patterns. Tyler Cowen is most likely to post in the morning, around 7 am, although he is also likely to post in the early afternoon. 

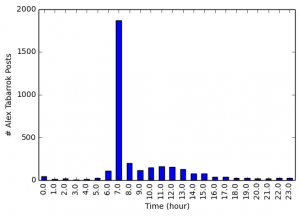
Alex Tabarrok clearly has a much more rigid blogging schedule. Almost all of his posts are published around 7 am.

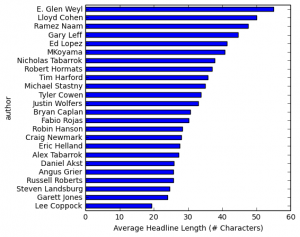
You can also get an idea of the writing techniques and writing habits of the blog authors. I’m barely scratching the surface of what’s possible here, but as a start I simply looked at the number of characters in the headline. The headline is the most important part of a blog post as it determines whether the reader will continue to read.

The longest headline in Marginal Revolution is 117 characters: The Icelandic Stock Exchange fell by 76% in early trading as it re-opened after closing for two days last week.” The table below shows the different average headline length for each of the blog authors. Tyler tends to use longer headlines than Alex.

Interestingly, when I read through the top 10 longest headlines, I noticed one called: “Browse every book hyperlink ever posted on Marginal Revolution (is this the second best website ever?)Clearly I’m not the first person to have scraped Marginal Revolution!

My goal now is to figure out what to do with this data to make the 3rd best website ever…

Addendum: In the comments, the creator of Marginal Revolution Books points to the github repository for his website.

Adventures in Open Data Hacking – Winnipeg Tree Data!

As a data guy, I’m pretty excited to see my city making a strong commitment to open data. The other day, I was sifting through some of this stuff to see what I could play with and what kind of interesting data mash-ups I could create with it. Very soon, my prayers were answered, with the Winnipeg tree inventory – yes, that’s right, the City of Winnipeg keeps a detailed database of all 300,000+ public trees located in the City, including botanical name, common name, tree size (diameter), and precise GPS coordinates!

After chuckling to myself in amusement for a while about how awesome this is, I dug into the data. Read on to see the results. 

You can find the code I used to create the visualizations here. For those curious, I used Python, along with a couple of amazing geographic mapping packages: GeoPandas (incorporates geographic data types into the Pandas package) and Folium (allows you to write Leaflet.js maps using Python code).

Most common trees

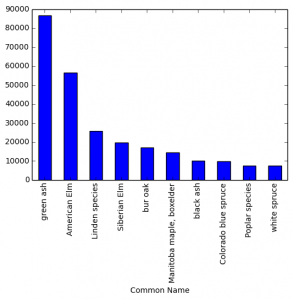
Turns out that, by far, the most common trees in the city are Green Ash and American Elm. These two types represent almost half of the trees in the database. Check out the plot below to see the top 10 tree types in the City.

Rarest trees

As shown in the previous plot, there are a few types of trees that totally dominate. Looking at the other end of the spectrum, there are quite a few tree types that are extremely rare, with only one or two of them found across the entire city. The map below shows the location of the 50 rarest trees (click on the tree to see the tree type). A valuable resource for all you rare tree hunters.

Biggest trees

The map below shows the 50 biggest trees in Winnipeg (by diameter). The size of each of the green dots represents the size of the tree. As you can see in the map, apparently there is a monster American Elm in Transcona that I may have to check out next time I’m the area.

Neighbourhoods with the most trees

Next, I thought I would mash-up the tree data with neighbourhood boundary data also available from the City of Winnipeg website to see what the tree situation is like for each neighbourhood.

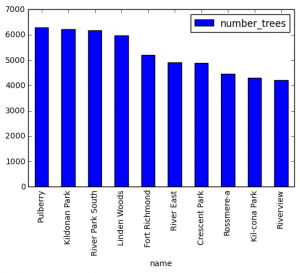
Looking at the total number of trees, Pulberry is in the lead, followed by Kildonan Park, River Park South, and Linden Woods.

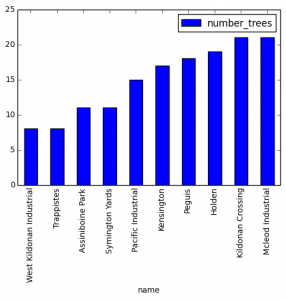
Here are the 10 neighbourhoods with the fewest trees.

I also put together a choropleth map to visualize at a glance the total number of trees in each neighbourhood.

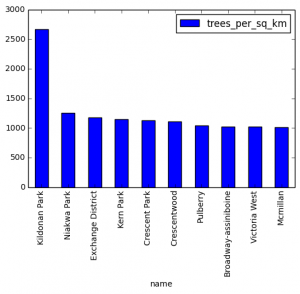
These measurements aren’t totally fair, since bigger neighbourhoods will naturally have more trees. A better measure of how tree-filled a neighbourhood is the tree density, or the number of trees per square kilometres. The map below shows the tree density of all the neighbourhoods in the city.

Looking at the top ten neighbourhoods in terms of tree density, many are (not surprisingly) parks (Kildonan Park is the most densely treed, by far).

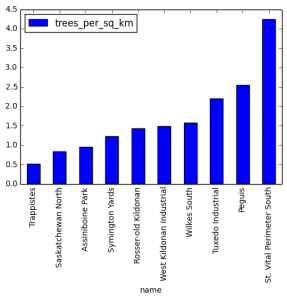
The plot below shows the 10 neighbourhoods with the lowest tree densities. Interestingly, Assiniboine Park is near the bottom. The only explanation I can think of is that the trees there are privately owned (the data only includes public trees).

Other ideas?

There are a lot of other ways you could slice, dice, and mash-up the data with other sources to get more interesting results. Here’s a few things I thought of:

  • Zooming in on one neighbourhood and show a dot map or heat map of all the trees to show the distribution.
  • Looking at  percentage of the trees that come from parks and filtering out park trees.
  • Developing a “tree index” for each neighbourhood (like something you would see on a real estate ad to describe the neighbourhood).
  • Examining the most common types of trees in each neighbourhood.

Comment below if you have any suggestions / requests!

Creating a Commonplace Book with Google Drive

Here’s a problem I’ve had for a long time: I would invest a lot of time into reading a great book, then inevitably as time passed the insights I gained would slowly disappear from my mind. This was pretty discouraging to me and seemed to defeat the purpose of reading the book in the first place.

So, I was very excited to come across this blog post by Ryan Holiday on keeping a “commonplace book”: your own personal repository of important insights from the various sources you encounter throughout your life.

The source of these insights can come from anywhere, like books, blogs, speeches, interactions you’ve had with others, interesting situations you’ve been in, jokes, personal life stories, ideas, etc. I’ve been doing it for about a year and have added 220 notes and counting. 

There are a bunch of benefits from keeping a commonplace book:

  • You can easily review it and go back to categories of ideas as you encounter challenges in your life, and your commonplace book will have all the most important insights for you at your disposal, ready to go. For example, if you have a challenge with one of your kids, you have your “parenting” category in your commonplace book ready to go to provide you with support.
  • You improve your reading skills by consolidating and condensing the most important and relevant material from your sources, as it forces you to think more carefully about what you’re reading and what it means.
  • By reviewing and reflecting on your commonplace book entries, you improve your writing skills and increase your memory and comprehension about the materials you’ve read.
  • You can use the quotes from your commonplace book to enhance in your own writing. For example, I’ve noticed Ryan Holiday’s writing liberally uses quotes from other sources. These often come from an extremely wide variety of sources and are really effective at supporting the points he is making in his writing. This is clearly the result of his voracious reading habits and commonplace book note-taking.

A commonplace book is like an investment that grows and grows over time. Much like a stock or bond, the earlier you invest, the bigger the payoff.

My commonplace book system

There are a million different ways that you can develop a commonplace book. There’s obviously no one “correct” way to do it, but hopefully my personal commonplace book system gives you some inspiration.

My system uses Google Docs, using a template designed to maximize my retention and reflection on the commonplace book notes and make the commonplace book easily searchable. The system also uses the Google Drive API to send myself daily emails each morning with commonplace book notes to review.

As much as possible, I’ve designed the system to take advantage of scientifically proven learning and retention techniques, including testing and recalling, spaced repetition, varied practice, and elaboration.

Aside: I highly recommend the book Make it Stick, which outlines the best evidence-supported study and learning methods and debunks a lot of common misconceptions, For example, re-reading passages and highlighting are horribly inefficient learning techniques.

My Template for Notes

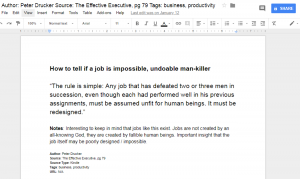
Here is the template that I use for each of my commonplace book notes:

I make one of these notes for each important point or insight that I come across. For a good book packed with useful information, I’ll probably create about 10-20 of these notes. Each of the components of this template have a specific purpose:

  • Title of Note: This typically labels the content of the note in some way to trigger my memory about what the passage is about. I try to make it somewhat vague so I don’t give away all the content. Then, when I review my notes, I’ll read only the title and then look away to try to recall what the passage is about. This is a way of incorporating testing and recall into my review. It helps improve retention and memory of the note and makes it more likely that I’ll have it in mind, ready to apply when the time is right.
  • Content: The main content of the note – usually a quotation, but not always.
  • Notes: A place where I can connect the content with existing knowledge and add any personal ideas or insights. Doing this kind of elaboration helps with understanding and retention.
  • Citation information: The author, source, page, and url so I know exactly where each passage came from and can look it up or cite it easily if necessary. This also makes the notes way more searchable. Google Drive has great built-in search features (as you would expect), making it easy to find notes from a particular author, book, or tag.

Here’s an example of a note I took from the business and management book The Effective Executive by Peter Drucker. I added this quote to my commonplace book because it had actually never really occurred to me that a job could be poorly designed and unfit for humans. Seemed like a good insight to keep in mind as a prospective employee and if I’m ever in the position of creating job positions myself. 

The Folder System

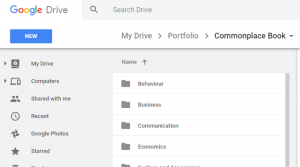
I divide my notes into folders and subfolders related to the topic. Often, one note could fit in more than one folder. To solve this problem, I make sure to write tags in the filename, and then randomly pick one of the relevant folders to put it in. Using tags, I can rely on search more easily for notes applicable to multiple topics. So if something belongs to both “Business” and “Productivity”, I can just add it to productivity and make sure I add both the business and productivity tags. 

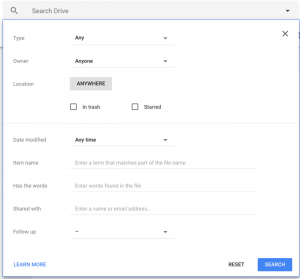
The great thing about having your notes in Google Drive is that you can take advantage of Google’s powerful search feature to find exactly what you need. For example, you can see below the options available in the search feature. You can search by file type, folder location, filename, and contents. With the structured note templates, you can find pretty much anything you need at the snap of a finger. For example, finding all the notes from Peter Drucker is simply a matter of writing in “Author: Peter Drucker” in the “Item Name” option shown below.

Daily Reviews Using Python and the Google Drive API

If you don’t have any programming knowledge, this commonplace book system will still serve you well and you don’t have to read on. But since this is a blog about hacking APIs and open data for the purposes of automation and competitive intelligence, there is more to my commonplace book system than simply adding documents to a Google Drive folder.

The commonplace book notes aren’t of much use if they’re just sitting in Google Docs unused, so I wanted to create a system of regular and automated review. Specifically, I wanted to receive an email every morning with 5 randomly selected notes from and review these notes a part of my daily routine. This helps incorporate the learning techniques of testing, spaced repetition, and varied practice. Regular review emails also give me a chance to edit notes if there are things I want to change or add.

You can find all of the code for this review system here. Here is an overview of what it does:

  • Selects 5 documents at random across all the files in your commonplace book folder and subfolders
  • Builds an email template with links to the five randomly selected commonplace book notes. It does this using the Jinja2 template engine.
  • Sends the email of commonplace book notes to review to yourself (and any other recipients you want). See this previous blog post on how to write programs to send automated email updates.

I run the code on a DigitalOcean droplet, set on a cron job to run build_email.py at 7 am every day.

Before you try to run the code, you should follow steps 1 and 2 in this Python quick-start guide to turn on the Google Drive API and install the Google Drive client library. This will produce client_secret.json that you will need to place in the top directory of the code.

You’ll also need to make a few substitutions to placeholders in the code:

  • Enter in your Gmail email and password in the file email_user_pass.json.
  • Enter in the email that will be sending the email update and the list of recipients in the file emails.json.
  • In build_email.py, you need to provide a value for COMMONPLACE_BOOK_FOLDER_ID. You can find this by looking in the URL when you navigate to your commonplace book folder in Google Drive.
  • Install any of the required packages in build_email.py

You can customize the way that the email looks by modifying templates/email.html.

Note that this code is useful not just for this commonplace book system, but any system where you need to receive automated email updates that randomly select files in your Google Drive.

Just do it

Start your common book now. Even if you don’t know Python and can’t do the automated email update stuff, it doesn’t matter. This is just icing on the cake, and there are other ways you can review your commonplace book notes.

Trust me, you won’t regret taking the time to do this. The only thing you’ll regret is the fact that you didn’t start doing it 20 years ago.

How to Build an Automated, Large-Scale Fax Survey Campaign using Python, docx-mailmerge, and Phaxio

You can find the full code for this project here:
https://github.com/marknagelberg/fax-survey-with-phaxio

For most people, fax is an antiquated, old-school technology that has basically no relevance to their lives at all. Most people nowadays probably don’t even know how to use a fax machine and would be annoyed if they were forced to.

But fax is by no means dead: a 2017 poll by Spiceworks suggests that approximately 89% of companies  still use fax machines, including 62% that still use physical fax devices. Fax is still very popular in particular industries, such as medicine. If you need to reach these businesses, fax is something to consider.

One of the main problems with physical fax machines is they are labour intensive. This can become an issue in scenarios where you need to send a lot of faxes or you need to send them in some automated way.

For example, suppose you’re conducting a survey of businesses and the only contact information is a fax number. Let’s say you have 5,000 people in your sample and each survey has unique information for each respondent (for example, their name or a unique ID value to track responses).

What do you do? At first glance, it looks like the only option is to print out each survey for each person on the sample, and then feed each survey by hand into the fax machine. If each survey takes a minute to fax, getting these out would mean 83 hours of work, or 2 full work weeks for a single person, plus printing costs (not to mention low morale). Not good!

Luckily, if you have some programming skills, there is a much better alternative: programmable fax APIs. I’m going to take you through an example of using one of these services called Phaxio to send out faxes for a hypothetical survey campaign. Here’s the scenario:

  • You have a sample of potential respondents in a CSV file that you want to fax information to which includes their fax number, name, address, and ID.
  • You have a template in a word document of the survey that you want to send. The survey needs to be slightly different for each person in the sample, including their particular name, address, and ID.

Solving this problem involves two main steps: 1) creating the documents to fax and 2) faxing them out.

Creating the documents to fax (using docx-mailmerge in Python)

Let’s say you have two people in the sample like this (it’s straightforward to generalize this to 500 or 5000 or higher sample sizes):

Picture1

And suppose the template of the survey you want to fax looks something like this:

Picture1

To get the documents ready to fax in Phaxio, we need to create separate documents for each person in the sample, each with the appropriate variable information (i.e. ID, Address, and Name) filled in.

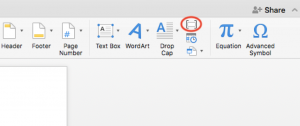
As a first step, you need to open up your fax template document in Microsoft Word and add the appropriate mail merge fields to the document. This actually was not as straightforward as I expected, but this guide from Practical Business Python blog was helpful. First you want to select the “Insert Field” button which can be found within the “Insert” tab:

Picture1

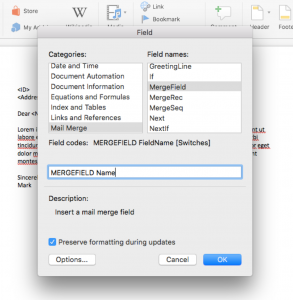
Then, you’ll be taken to a pop-up where you’ll want to select the category “Mail Merge” and the field name “MergeField”, and write the desired name of your field. Repeat this step for all fields you need (in our case, three times: once for Name, Address, and ID).

Picture1

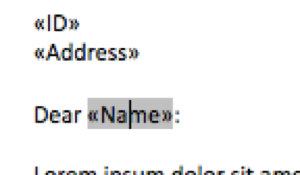
This produces the mergeable fields that you can copy and paste throughout the document as needed. You can tell it worked when there is a greyed out box that appears when you click your cursor over the field:

Picture1

Now that your Word document template is prepped, you are ready to do the mail merge to create a unique document for each person in the sample. Since we need to separate each merged document into a separate file, this cannot be done in Microsoft Word (the standard mail merge in Word combines all the documents into one big file).

To do this, there is a handy little library called docx-mailmerge built exactly for the purpose of doing custom mail merges in Microsoft Word with Python.  To install the library, type:

$ pip install docx-mailmerge

Using docx-mailmerge, loading the csv sample values into the Word document is simply a matter of calling the merge function, which contains each merge field in the Word document as an argument and allows you to assign these fields the string values of sample information you want to fill in:

from mailmerge import MailMerge
import pandas as pd
import os

def merge_documents(sample_file, template_file, folder):
df = pd.read_csv(sample_file)

for index, row in df.iterrows():
with MailMerge(template_file) as document:
document.merge(Name = str(row['Name']),
Address = str(row['Address']),ID = str(row['ID']))
document.write(os.path.join(folder, 
str(row['Fax Number']) + '.docx'))

This produces a folder full of all the documents that you want to fax with the variable information filled and the fax number included as the filename.

Faxing the documents out with Phaxio

To get started with Phaxio, you first need to create an account (https://www.phaxio.com/). Once you’ve done that, install Phaxio’s Python client library, which makes it easy to interact with its API:

$ pip install phaxio

The code below for the send_fax function takes in your personal Phaxio key and secret (provided by Phaxio when you create your account), the fax number, the file to fax. It sets a time delay of 1.5 seconds in between faxes (the Phaxio rate limit is 1 request per second).

from phaxio import PhaxioApi
import time

def send_fax(key, secret, fax_number, filename):
time.sleep(1.5)
api = PhaxioApi(key, secret)
response = api.Fax.send(to = fax_number,
files = filename)

With this function, sending out your faxes is just a matter of iterating through the Word files you created in the mail merge and passing them to send_fax (along with the fax_number, which appears in the filename).

To Come: Using the Twilio Programmable Fax API

Although Phaxio is a fantastic tool, it is considerably more expensive than the fax API provided by Twilio (https://www.twilio.com/fax): the Phaxio API costs 7 cents per page, while the Twilio fax API only costs 1 cent per page. Although this seems like a minor difference given the low numbers involved, this really adds up if you are sending a lot of faxes. For example, say you are sending out a survey via fax to 5,000 potential respondents and the survey is 5 pages long. Using Phaxio, this would cost $1,750, while Twilio would cost only $250. The more documents you fax, the wider this price gap grows.

However, you do pay a price for using Twilio due to added complexity: Twilio does not let you pass in binary files into it’s API – you must pass in a URL to the file you want to fax and cannot just point to the documents on your local disk. This would be a great feature for Twilio to have (take note, Twilio!), but since it doesn’t yet exist, you have to configure a server that provides the documents you want to fax to Twilio. Doing this securely is by no means a straightforward task, but I’ll cover this in a future post…Stay tuned!

Setting up Email Updates for your Scraper using Python and a Gmail Account

Very often when building web scrapers (and lots of other scripts), you’ll run into one of these situations:

  • You want to send the program’s results to someone else
  • You’re running the script on a remote server and you want automatic, real-time reports on results (e.g. updates on price information from an online retailer, an update indicating a competing company has made changes to their job openings site)

One easy and effective solution is to have your web scraping scripts automatically email their results to you (or anyone else that’s interested).

It turns out this is extremely easy to do in Python. All you need is a Gmail account and you can piggyback on Google’s Simple Mail Transfer Protocol (SMTP) servers. I’ve found this technique really useful, especially for a recent project I created to send myself and my family monthly financial updates from a program that does some customized calculations on our Mint account data.

The first step is importing the built-in Python packages that will do most of the work for us:

import smtplib
from email.mime.text import MIMEText

smtplib is the built-in Python SMTP protocol client that allows us to connect to our email account and send mail via SMTP.

The MIMEText class is used to define the contents of the email. MIME (Multipurpose Internet Mail Extensions) is a standard for formatting files to be sent over the internet so they can be viewed in a browser or email application. It’s been around for ages and it basically allows you to send stuff other than ASCII text over email, such as audio, video, images, and other good stuff. The example below is for sending an email that contains HTML.

Here is example code to build your MIME email:

sender = 'your_email@email.com'
receivers = ['recipient1@recipient.com', 'recipient2@recipient.com']
body_of_email = 'String of html to display in the email'
msg = MIMEText(body_of_email, 'html')
msg['Subject'] = 'Subject line goes here'
msg['From'] = sender
msg['To'] = ','.join(receivers)

The MIMEText object takes in the email message as a string and also specifies that the message has an html “subtype”. See this site for a useful list of MIME media types and the corresponding subtypes. Check out the Python email.mime docs for other classes available to send other types of MIME messages (e.g. MIMEAudio, MIMEImage).

Next, we connect to the Gmail SMTP server with host ‘smtp.gmail.com’ and port 465, login with your Gmail account credentials, and send it off:

s = smtplib.SMTP_SSL(host = 'smtp.gmail.com', port = 465)
s.login(user = 'your_username', password = ‘your_password')
s.sendmail(sender, receivers, msg.as_string())
s.quit()

Heads up: notice that the list of email recipients needs to be expressed as a string in the assignment to msg[‘From’] (with each email separated by a comma), and expressed as a Python list when specified in smtplib object s.sendmail(sender, receivers, msg.as_string(). (For quite a while, I was banging my head against the wall trying to figure out why the message was only sending to the first recipient or not sending at all, and this was the source of the error. I finally came across this StackExchange post which solved the problem.)

As a last step, you need to change your Gmail account settings to allow access to “less secure apps” so your Python script can access your account and send emails from it (see instructions here). A scraper running on your computer or another machine is considered “less secure” because your application is considered a third party and it is sending your credentials directly to Gmail to gain access. Instead, third party applications should be using an authorization mechanism like OAuth to gain access to aspects of your account (see discussion here).

Of course, you don’t have to worry about your own application accessing your account since you know it isn’t acting maliciously. However, if other untrusted applications can do this, they may store your login credentials without telling you or doing other nasty things.  So, allowing access from less secure apps makes your Gmail account a little less secure.

If you’re not comfortable turning on access to less secure apps on your personal Gmail account, one option is to create a second Gmail account solely for the purpose of sending emails from your applications. That way, if that account is compromised for some reason due to less secure app access being turned on, the attacker would only be able to see sent mail from the scraper.